Monday, 9 January 2012

Review: 15mm FOW Plastic Soldier Company SdKfz 251/D

I'm currently doing a mini-series of reviews on the various 15mm vehicles I've recently put together. A few days ago it was Old Glory's Panther Auf G, today its the turn of my Plastic Soldier Company (PSC) SdKfz 251/D half-tracks. 


In the box you get 5 half-track sprues, each with 7 crew figures (2 drivers, 1 gunner and 4 sitting panzergrenadiers) and a fantastic selection of stowage. Unfortunately there are no decals or components for making a 251/10 (37mm gun) or other variants in the set but the PSC is planning to bring out conversion sprues for this purpose in a few months time, which is great news. I didn't take a picture of the sprues but here are all of the components cut out: 

Everything in the set.
The main vehicle components. Note how great the track pieces look. 

The stowage and passenger MG
The crew and main MG
As you can see, all of the components are of a high standard with nice sharp edges and fine details. The crew are slightly worse sculpts and lack variety - I think PSC could have been a lot more creative here and had guys leaping off the half-track or gesticulating etc. But perhaps thats just me. 

The half-tracks go together quite well but assembly, including cutting out and cleaning, up can take around 15-25 mins depending on how fast you are (I'm pretty slow as I often watch TV and put stuff together). These kits are just that, a kit. They go together more like a scale model kit than a wargames model so be prepared to invest some time in them. However, I think the result is definitely worth it. Pictured below are 6 of my 251/Ds  (at the time of photographing I had yet to finish the last 4). In addition to the stowage supplied on the sprues I'd also added a few items from Old Glory's stowage set but this isn't really necessary given the good range of stowage you get in the box. 

The wonkyness of the rear rank is because they're on a slope, the models are fine. 

I did a quick headswap (more will follow on the other crew) on this gunner. 
A few green-stuff sandbags, just for variety. 


Some of the side panels, like the one above, didn't sit flush with the rest of the side armour. I think this might well have been my fault in assembly rather than an error with the kit. 


I decided not to stick the gun-shields in place on these vehicles so that I could remove them and make them interchangeable with the /10 version. I also didn't stick the rear MG in place as they look prone to breakage (they sit fine without the glue) and will make the gunners removable (by putting a pin in their foot and a hole in the floor of the half-track) so that the fragile MGs can be removed and won't break off or bend in transport. I couldn't find a suitable place to stach any coins in these to add weight but with some effort you could probably fit something in the empty engine compartment. The crews are not present either as they'll be easier to paint separately and I plan to do quite a few conversions/use a mix of figures I have left over. 


Pros
  1. Cheap! As you may have guessed I like cheap. They're £16.50 from the PSC or available for £14.75 on Ebay from various sellers - an absolute Bargain compared to Battlefront's, Skytrex's or FIB's offerings at around twice the price. I wouldn't trust the equally cheap Old Glory versions.
  2. Crisp details, sharp lines. Really good track pieces. 
  3. Good scale - matches BF's half-tracks. 
  4. Great selection of stowage - comes in useful for lots of other projects. 
Cons
  1. Assembly time - 15-25 mins is a lot for one vehicle (after all you're going to need loads). 
  2. Fragile MGs. 
  3. No decals. 
  4. No option for 251/10 in the set itself. 
Conclusion: 

Two kinds of people will want these. Firstly, those with time rather than money and secondly those who want the crispest, sharpest details available. If you're not too bothered about getting the 'best' looking half-tracks and you have money, rather than time, then get one of the competitors versions, probably FIB's or BF's. 

Sunday, 8 January 2012

15mm FOW Objective Marker

A quick objective marker I put together. The components are left-over bits and pieces from the PSC's 250/1 Halftrack kit, their Panzer IVs and some Old Glory fuel drums. The quality and variety of stowage pieces you get with the PSC kits is really fantastic - I couldn't possibly use them all. Part of me feels the scene needs a campfire or something but this would seem a little stupid given the piles of fuel drums and ordnance nearby...  

The sitting figures are halftrack crew. 


The sandbags are just a quick green stuff job achieved by rolling green stuff into little fast sausages, stacking them, and then using a sculpting tool to emphasise the gaps and press them a little flatter. I still haven't quite got the hang of making them look exactly like sandbags - they need to be squarer and more saggy - but they're half-way there and look fine when painted up. 


I'm planning on giving this a lick of paint when I get sick of painting panzergrenadiers (one platoon down, one to go). 

Friday, 6 January 2012

Review and Modelling Guide: 15mm Command Decision/Old Glory Panther Auf G

Due to airbrush teething problems and time restrictions I've been unable to get my WW2 armour painted up, however, I thought I'd write a few reviews of the models involved instead. Enjoy!

First up are my 15mm Panther Auf Gs from Command Decision/Old Glory. Anyone who has bought from this company before will know that the products you receive can be very mixed, my experience was no different. I opened the bag and was initially quite disappointed. The big cats had quite a large amount of flash (albeit easily removable) but the main problem was some really poor casting, this was especially evident on the vehicles' rear right hull side and on the rear exhausts (see pictures below).


I know its out of focus but you can see the flash gumming up between the exhausts. The storage containers are also a little soft.

It should look more or less like this...
This rear flank is all soft and distorted (again, not the best picture). 
Most of the track detail was pretty good. 
But a couple of pieces looked like this. This took A LOT of tidying up to make it passable. 
Each tank about an hours worth of tidying up, filing, cutting and green stuffing. Quite a time investment. Below are some pictures of the green stuff work I did to try and repair areas where the casting was very soft. 

I know this isn't how the storage containers should look, but covering them with zimmereit was an easy fix. 


Green stuff shaped and pressed with a piece of wire to resemble zimmereit. 
I had also ordered the Command Decision line's stowage set. Again there were issues with the casting, some pieces were good, others were soft or malformed. The barrels were the worst - most of the 'hoops' didn't even line up, there were huge mould lines and the edges were soft rather than sharp and defined. Overall I'd rate them as acceptable - barely.


Here are a few pics of the assembled models, cleaned up, and with stowage added. Surprisingly I had no problems joining the tracks to the hull - this was a straight forward superglue job, following a guide rail moulded onto each inner track surface. Overall, they look very presentable, after a lot of work. (Btw I realise the stowage is not arranged accurately, I was going for something I found aesthetically pleasing rather than strictly historically correct). I can't help but get the feeling that that I'm going to regret all this stowage when it comes to putting on the decals...


I quite like the added fuel drums. Whilst no doubt historically inaccurate they make these cats look like they are ready for a long campaign.
It doesn't show up well on these photos but the MG on the front glacis was originally a strangely moulded lump - a flawed workaround following casting issues I suspect. I scraped the whole thing off, drilled a hole and replaced the MG with some wire. Yet another issue that required a fix. 

Below are some pictures of the overall finished models with a few more stowage items added (leftovers from the Plastic Soldier Company's 250/1 kits I had). I intentionally bent the front mudguards on a couple of the tanks to give them a used, weathered feel. Crew figures are from Command Decision's 'Tank Crew' set. In my opinion these are great figures; well proportioned and full of character (cheap too!) 


This was a simple conversion using an infantyman from the 'Command' set,  a standard tank crewman with the head removed and repositioned, a plastic MP40 from the PSC's Late-war infantry set and few short lengths of wire for casings. 
Pros
  1. They were cheap! I got them from War Web (60% discount overall!) for a steal at approximately £8-9 for 3. The Battlefront equivalents are £7.65, EACH! Forged in Battle's are £17.25 for 3 whilst the PSC has yet to release their (probably great and cheap) version. Skytrex also produce better cast versions from the same masters for £7.25 each. 
  2. The sculpts and detail are pretty good, although not Battlefront quality. 
  3. They have great heft. They really feel like tanks. Seriously. 
  4. They don't have integral bases. 
  5. They're very robust - I think if you dropped one you'd get away with it, unlike resin. 
Cons
  1. They need a lot of work. Areas of detail are sometimes soft or miscast. If you're a perfectionist you'll end up disappointed. Remember; keep the greenstuff handy!
  2. The detail is good but they're no Battlefront or FIB. 
  3. They're heavy - I can see safe transport becoming an issue.
  4. Casting Issues - I can't help but feel the moulds for these were worn out and needed replacing. This seems to be a recurring criticism of some of Old Glory's lines and I saw it in evidence in the other models I received from this company, mostly the tanks. Be aware. 
  5. EDIT: After some comment from the guys on the TMP forum it seems like they're also a little dodgy with regards to historical accuracy; the zimmereit should be of a more 'square' patterning. 
Conclusion:

Overall I'm happy with these models. If you're time rich and money poor (i.e. Me) then they're a good option. If you want the best, then look elsewhere. Personally I wish I'd waited to see the PSC offering before buying these. Ultimately, If I think the PSC's version looks better (and if the price is right) then I might just get them anyway. More Panthers can't be bad!

These are currently undercoated and awaiting me getting my act together on the airbrush. When complete they'll be part of my late-war Panzer Lehr force - my first FOW army - which is currently under construction. 

Wednesday, 4 January 2012

Airbrushing FOW Vehicles


I managed to get some airbrushing done yesterday and the day before. The weather improved which helped but I also decided to move indoors from the shed and set up the compressor in the house. This helped to get rid of the streakyness and extremely slow drying times I'd had problems with in the shed. The good news is that I got all of the vehicles I have (10 250/1 halftracks, 5 Panzer IV Hs, 3 Tiger Es and 3 Panther Auf Gs) undercoated in Vallejo's Green Ochre, a close enough approximation of dunkelgelb. I primed them first with GW's Skull White spray (a 7 year vintage which had survived surprisingly well) beforehand and this gave a decent surface for the airbrush to work with. I had some problems getting decent coverage on the Panzer IVs due to the fiddly surfaces (Schurzen are not my friend...) but got there in the end after some perseverance.

The general set-up. 
The basecoated Panzer IVs. 

Everything else. I was quite pleased with how smooth a finish the airbrush allowed me to get. 

However, it all went wrong when I started applying the next two colours of the classic late-war camouflage scheme I was aiming for. I grabbed what I thought was the correct green (turns out I picked up German Camouflage Green, which is much too dark) and happily airbrushed away on the 5 Panzer IVs until I realised it wasn't just the crap light but that I had in fact got the colours wrong. Sigh. I had meant to use Reflective Green, which is a few shades lighter. As it turned out it probably didn't mater that much, I discovered something; I can't really airbrush. To be honest, this shouldn't have been a surprise, this was my 3rd attempt or so and whilst I'd really got the hang of a general undercoat when it came to camouflage patterns I was appalling. I realised that I had the technique wrong (I needed to be much more careful with how much paint I applied on the dual action trigger) and had the pressure too high (perhaps) at around 25-30 psi (if someone could advise me on this that would be great....). I ended up with an inconsistent and often splattery mess. I managed to get it right in patches and when this occurred, asides from being the wrong colour, it looked pretty good. I also think the fact that I mixed my own paint using medium was a factor;  I had no consistent means of making sure I was getting the mix correct (around 1:1 from what I read online).

I'm afraid I didn't snap any pictures of these Frankensteins; I'd run out of time (I was moving back to London that afternoon) and to some degree, enthusiasm. My plan is to come back to these in a couple of months when I'm back home with the airbrush and compressor. I'm also going to buy some of Vallejo's model air line of paints to eliminate paint consistency as another unreliable factor. Originally I was planning to take these with me and keep you posted on their progress throughout - seems like I'll have to settle for some infantry painting instead. Every cloud has a silver lining and in this case that silver lining is zombies. Lots of zombies. Nazi zombies.

Tuesday, 3 January 2012

Shadows over Camelot: Brief Review


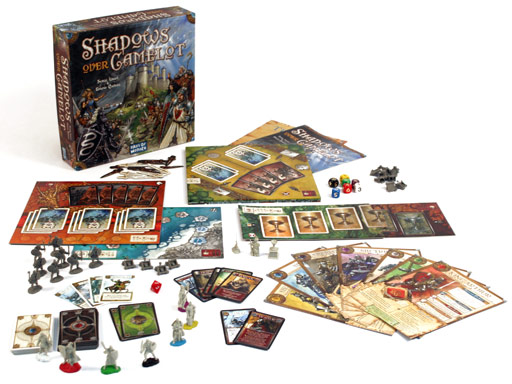
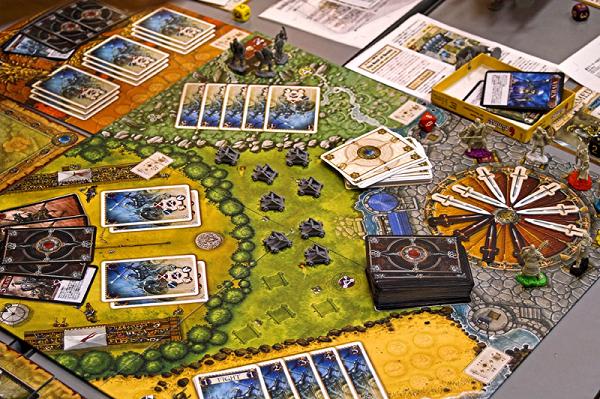
I got a chance to play Shadows over Camelot earlier today with some friends and thought I'd put my impressions down. I didn't have a camera handy so I'm sourcing my images from the web, in truth the game looked just as good in the flesh as in these pictures. 

Components:

As you can see from the images below (these were collected from the web and are perfectly representative of the quality of the components) they component quality is very high. I'm used to the kind of quality available from large manufacturers such as Fantasy Flight Games (I have their BSG boardgame which is excellently made) and this game did not disappoint. The artwork is good and the cards and boards all have high quality illustrations. They're exactly as you'd expect. 


The miniatures are extremely detailed by boardgame standards and would even stand up well on a wargames table, though they are not 'collectors' quality. The makers of the BSG components would have done well to learn from them. Unfortunately they are made from a relatively soft plastic which gives the weapons a tendency to bend and droop. The poses are also a little stiff and uninspired. I can't personally comment on how well they take paint as I haven't tried (the game isn't mine!) but other have painted them with great success.

With a lick of paint the miniatures look great, these were painted by the Guild Master.
Some players have gone even further and re-created the board in 3D - the results are staggeringly good! I don't think I could ever hope to match how well these have been done. Bravo lads!


Gameplay and Mechanics:

The game is relatively complex due to the number of simultaneous quest boards in operation but the principles are extremely simple - like any good game. Players select/draw a character, each character is identical except for their special ability. Special abilities range from King Arthur's ability to swap a card from the controlling player's hand with a card from another players hand once per turn to Galahad's ability to play 'special' White cards as free actions - overall they are extremely useful.

The game board consists of a number of satellite quest boards (The Grail Quest, the Excalibur Quest and the Lancelot/Dragon Quest) as well as the main board which is divided into 4 main zones; the Black Knight, the Pictish War, the Saxon War and Camelot. There are two decks of cards, White and Black. The White deck contains cards which help the players, such as Fight Cards, Grail Cards (to complete the Grail Quest) and special cards, including Merlin cards (which allow black cards and negative effects to be reversed or ignored). Black cards have negative effects; they reduce progress on the Grail or Excalibur Quest, add enemies to the Pictish/Saxon Wars, add catapults to besiege Camelot, and add Fight Cards to the Lancelot/Dragon and Black Knight Quests. The Black deck also contains rarer 'Special' Black cards with more varied and dangerous effects e.g. The Mists of Avalon, this card remains in play and adds another Black Sword to each failed quest. Nasty. 

Players draw cards (but only whilst in Camelot) and then must travel around the various boards completing quests; failed quests lose life points and add Black Swords (negative victory markers) whilst completed quests gain players life points and add White Swords (positive victory markers) to the Round Table in Camelot. The precise mechanics vary from quest to quest; some involve discarding cards, others amassing Fight Cards either in matching pairs and triplets (in opposition to accumulating Black Fight cards) or in numerical sequence. The Grail Quest is the most difficult to complete (with the exception of the Dragon) but unlike the latter also provides a substantial benefit (3 White Swords, Life points and the Grail itself). Magical items such as the Holy Grail, Lancelot's Armour and Excalibur are won as rewards for completing quests and provide bonuses e.g. Lancelot's armour allows the player to overturn 2 Black cards at the start of their turn, pick one to play, and place the other at the bottom of the deck.

The players turn consists of two phases. In the first they must resolve a negative result, either losing a life point, placing a catapult to besiege Camelot or drawing and resolving a Black card. In the second phase they move, carry out actions and play special cards.

The game also contains a 'Traitor' amongst the knight's ranks, assigned secretly via loyalty cards, who attempts to undermine the Knight's objectives. Players can reveal him by spending an action 'accusing' another player. This element adds both a greater level of depth and tactical complexity as well as moving the game away slightly from its exclusively cooperative tendency. As we were playing for the first time we didn't play this element of the game.

The Knight's lose the game if the number of  Black swords on the Round Table equals 7 or more, similarly they win if there are 7 or more White Swords. There are only 12 slots and the game finishes when these are full or if there are 12 catapults besieging Camelot at the end of a players turn (in which case the Knight's also lose).

These aren't all the rules or mechanics (there's a few more intricacies) but it at least it gives you an idea of what the game is about.

Thoughts:

This game is hard. Real hard. The first time we played we realised we'd made several key strategic errors early on and restarted after only 3 or 4 turns. The second time we did much better and eventually won - by one White Sword - although to be fair we weren't even using the Traitor. When its boiled down the game is chiefly about strategic resource management - you only have so many players and cards, therefore you have to make a plan about what to try and complete and on what to operate damage limitation. You simply can't complete all the quests at once so you have to be strategic in choosing what to invest in, when and how much. There is little point in fighting losing battles. In our game we pretty much ignored the Excalibur quest (The sword is the worst of the magical items you can receive) and focused on the Grail and Lancelot quests, which promised better rewards. This, along with out strategy of avoiding drawing black cards (the special one are really nasty) and instead losing life points and placing catapults, seemed to pay off.  This game seems like it would have decent re-playability, especially given the Traitor mechanism, but it's early days and we'll need to play it a few more times before this becomes completely apparent. There are also a number of modified scenarios in the back of the rule-book for tweaking the game with a mind to playability.

Conclusion:

Overall a well put together game with great quality components. The mechanics are simple but in aggregate provide hard strategic decisions requiring cooperative resource management. The immersion is not on par with something like BSG which sees players entering their characters worldview (accusations and counter-accusations flying thick and fast) but this might come out more when we try out the Traitor mechanic next time around. 8 out of 10.

Monday, 2 January 2012

Preparing FOW Vehicles for Airbrushing

Just a quick post by way of an update. I've mounted up my various FOW vehicles on wooden stands (just offcuts I found in the shed)  and other odds and ends ready for airbrushing. I've seen as many different ways of doing this as there are modellers on the interent - I simply used a dab of superglue rather than faffing around with magnets or wires. At the end of the painting I'll just work them loose. Here's some pictures of the lot ready to go, along with the airbrush and medium I use.

Some old wooden dice re-purposed.


The whole lot. 

Not the best airbrush in the world but its double action and it works. 
I've had a quick trial run in the shed and the set-up works ok. Its a bit cold here at the moment (5 celsius) and the humidity is high (about 80%) so the paint has dried a little streaky. Tomorrow afternoon will be considerably warmer with much lower humidity (60%) so that should give me a really good opportunity to get the tripartite camo on these finished, with some luck.


Sunday, 1 January 2012

Star Wars Miniatures: Fleet Review

Happy New Year folks! I certainly had a good one, three old friends from university came up for a few days and we made our way through many a crate of bear (and most of a bottle of Jura). This does mean I haven't made any posts for a few days but I'm gonna make up for this over the next few days, plenty to do. I don't really make new year's resolutions but if I did, this blog would be one of them!

In my first post I mentioned that I've taken some pictures of some of the spaceship miniatures I have. This isn't all I have; I have lots more either unpainted or in a state of ill repair (broken stands mostly), but here's what was available, enjoy! (apologies for the pictures, I'm still having teething troubles with them and am by no means a natural photographer - any tips would be appreciated!).


First up is an Imperial I class Star Destroyer. I got a lot of my other Star Wars ships from either Studio BergstromOdyssey slipways or WotC's (Wizards of the Coast) Starship Battles game. However, non of these make a star destroyer which is a). the right size (this one is around 16cm, or 1:10,000, my fleet's scale) or b). not ludicrously expensive and/or rare.

This one is from an old Hallmark range of christmas gifts and has pretty damn good detail, not to mention being more readily available. It originally came with a blockade runner attached to the front on a wire which I removed and recycled. At the moment its just mounted on some wire and an old GW base, eventually It'll get one of Bergstrom's large metal hex bases to give it some stability and heft.


Next up is a Mon Calamari MC-80 Starcruiser (i.e. Home One) from the WotC range with a paint job added. Originally I tried to paint this exactly like the one from the film which if you look closely is made from loads of different coloured panels and pods - it looked crap so I gave up and went with something simpler. In reality this paint job looks a bit better - there's a lot more depth to the hull colour from different washes and drybrushes. Someday I might get round to adding plasma exhaust jets using green stuff or similar to my ships which would really help bring them to life a bit more.


This model is about 14cmish long so it fits well with the Star Destroyer (although it's a little spindley - one day I will scatchbuild my own) if you follow the 'official' MC80 dimensions (1,300m) rather than extrapolations from the films.


My mediocre attempt at object source lighting on the engines.
Here's my Mon Calamari MC80 'Liberty type' Starcruiser. Again its from the WotC line with a new paint job and base. Like the other miniatures I have from WotC it could do with some super detailing to get the all the intricate panels and protrusions on the original ships but I'm lazy. I'm quite proud of the colour scheme on this one, its pretty damn close to the one from the films, here's the pics and a comparison:


As you can see, its not far off. It needs a few blacker patches. (note: these pictures where taken with both the halogen and daylight bulbs on so they've come out a bit yellow - the colours in the first image are actually much greyer in 'normal' light).


In this last one you can see that the model is quite bent. There's not much I can do about this, its the soft plastic. I've tried heating and bending but it just springs back in time...
Here's my pair of CR90 Corvettes (Blockade Runners) which were clipped off from my Star Destroyers and repainted. The detail on these isn't great but it'll do until I can get some from slipways sometime. They're also a little large, but I don't mind; otherwise they'd have to be tiny.


My Rebel Assault Frigate Mark 1 (converted Imperial Dreadnought) from odyssey slipways. This is one of the first I got so the paint job is a lot rougher this close up. I really like the design aesthetic of this class, it really looks like what its meant to represent  - a hastily refitted and modified warship. As its from slipways its 1:10,000 scale (about 7-8cm as I remember).


These engines would look much better with some exhaust jets!

The Millenium Falcon from Studio Bergstrom. The detail on this is very good (apart from the underside) and its about the right size in comparison to the the other fleetscale fighters (also all from Studio Bergstrom) that I have.


My X-Wings. I mount my fighter squadrons two to a base like this ( I can't afford to have 6 and 2 looks almost as good as 3 in my opinion). The bases were super cheap plastics (always good for fighters) from em4 miniatures. I really didn't like the ones from Bergstrom; they're made of silicon, don't take paint and are grey (although I think he may have changed them to black by now).


A-Wings


Y-Wings


B-Wings. These sculpts are probably the worst of the Bergstrom fighters I have, although the Tie interceptors are also too small imo.


Tie-Fighters. These still need their final highlight. I also have some Interceptors and some Tie Bombers but I have yet to paint them so I didn't bother to take pictures.


I have a few other painted Star Wars ships; a couple of scratchbuilt ships with a Star Wars universe 'look' as well as a trio of nicely detailed Nebulon B frigates. However, they've all suffered some terrible accidents whilst in storage and are in poor shape, some serious pinning needs to take place - especially on the nebulon Bs which are in scale and thus tiny. I also have another Star Destroyer to paint up and base, three die-cast Venerators to repaint and base, 3 micro-machines star destroyers to convert into Victory class Star Destroyers (although I might just end up scatchbuilding them instread) and some trade federation battleships I got super-cheap from ebay to toy with... In the latter's case I would need to scratchbuild the fighters for them if I got round to building them but thats a challenge for another day.


Whats coming up?

I've taken a few pictures of my BSG stuff but need to dig the rest out and do some fixing-up - stay tuned for another fleet review in the near future! Tomorrow I plan to have a go at airbrushing my FOW armour. This is probably going to turn into a nightmare but I'll let you know how it goes, along with some pictures hopefully.

I'll leave you with some pictures of the rebel fleet. Adios.


Related Posts Plugin for WordPress, Blogger...